PROGRESS 03 - Importing a textured model into the Crysis editor
PROGRESS 02 - Importing a textured model into the Crysis editor
I read Teresa’s journal. She has successfully imported the model into the Crysis editor for her tech test. So, I had a chat with her and asked about the softwares she uses. She suggested me to use Max 9 and install SDK plug in. Now, I got the SDK and was still downloading Max 9 from the Internet. It is quite huge. This might take the whole day to download it. I hope it will go well afterward.
PROGRESS 01 - Importing a textured model into the Crysis editor
Wilson and Jack completed their assigned tasks which are a drafting model and terrain. My next task is to do texture and import them into the Crysis editor. In order to do this, they need to send me Revit and Crysis files. We used Fileplanet as our shared repository so we can upload/download files from there without meeting up. By using Fileplanet, we also have a backup file on the network.
After I got the files, I textured the model in Sketchup and then exported it to the Crysis Editor by carefully following the instructions from the Wiki class.
Everything seemed to be fine but after reopening the map, the textures disappeared as the images below. I tried several ways but had no idea to solve the problem. I searched for the resolution from the Internet and saw a number of people having the same problem as me but no one can answer it. http://www.crymod.com/thread.php?postid=463541. At night, I sent my team an e-mail that I was not able to finish by the time schedule and needed help. I really appreciate for the quick responded messages from them. We will have a meeting tomorrow (Monday, 31 March 2009).
TEAM MEETING
Each of us focused on their own assigned tasks but if one needs help, we are all willing to help each other. Today, Wilson continued working on modelling and it seemed smooth. Jack was generating terrain. We used a tropical land as our environment. Swati was doing a test on lighting. For me, I was focusing on textures and importing a model. I found some good textures from the Internet. As our building (Well City) is situated underground, therefore we decided to mainly use stone and wood for the overall structure. The textures below are the best ones that we might use in our model.
 - Above ground floor texture
 - Window
  - Floor
 - External wall
 - Internal wall
 - Internal wall 02
http://www.python.org/download/
- Python File Format Interface
http://sourceforge.net/project/platformdownload.php?group_id=199269&sel_platform=3089
- ColladaCGF
http;//sourceforge.net/project/showfiles.php?group_id=235915&package_id=286549
- Paint.Net
http://www.dotpdn.com/downloads/pdn.html
SHARED REPOSITORIES
Youtube has become the most successful Internet site providing a video sharing service. It allows users to upload videos effortlessly, automatically converting from many different formats, and to tag uploaded videos with keywords. As a team we can easily share videos by mailing links to them, or embedding them on web pages or in blogs. [3]
Google 3d Warehouse is an online repository of 3D model. It allows users to search, share and store 3D models. In order to use Google 3d Warehouse as a collaboration tool, it requires each collaborator’s email address. If the model is changed by one of collaborators, a notice will be sent to the model owner/leader. The model owner can accept or reject any changes. [4]
Filefront is a computer game and video game download/upload service. It provides patches, demos, modifications and other generated game related content. Filefront will be indefinitely suspended on coming March 30, 2009. [5] However, another source called Fileplanet also serves similar services as Filefront. Users can either pay a fee to access high-speed servers with no wait times, or freely wait a certain amount of time before downloading. [6]
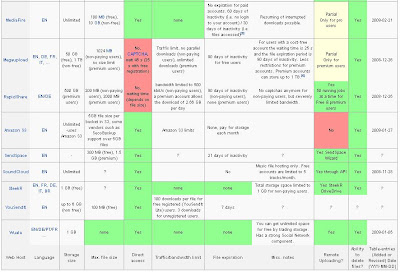
The table below presents a comparison of famous file hosting services used for file sharing. [7] For the purpose of our team project, we will use various repositories depending on the type of work. However, we need to consider that a good repository should have a large or suitable storage/upload size, an efficient and friendly user-interface. It should also allow all sorts of file types to upload.

References
[1] Chapple, M 2009, Repository Definition, About.com, accessed on 26 March 2009, http://databases.about.com/cs/administration/g/repository.htm.
[2] Duncan, C, Learning Object Repositories to Support Collaborating Communities, accessed on 26 March 2009, http://www.elc.edu.sa/5thseminar/ppt/duncan(interallect).pps.
[3] Cheng, X, Dale, C, and Liu, J 2005, Understanding the Characteristics of Internet Short Video Sharing: YouTube as a Case Study, accessed on 26 March 2009, http://www.webdialogues.net/cs/cdc-new_media-library/download/dlib/1056/YouTubeCharacteristics.pdf?x-r=pcfile_d.
[4] Google 2009, 3D Warehouse Privacy Notice, accessed on26 March 2009, http://www.google.com/intl/en/sketchup/3dwh/privacy.html.
[5] Wikipedia 2009, FileFront, accessed on 26 March 2009, http://en.wikipedia.org/wiki/Filefront.
[6] Wikipedia 2009, FilePlanet, accessed on 26 March 2009, http://en.wikipedia.org/wiki/FilePlanet.
[7] Wikipedia 2009, File hosting service, accessed on 26 March 2009, http://en.wikipedia.org/wiki/File_hosting_service.
TECH TESTS - IMPORTING MATERIAL TO CRYSIS
During the week, I have been searching for information about the method of importing materials to the Crysis. I found many useful video tutorials from WonderHowTo website. The video tutorials guide us step by step through the process of exporting from 3ds max into the game Crysis. However, they are quite long, so I decided to take some notes and capture images. I hope that this website would be helpful, not only for my team but for all people who are interested in.
Part01 - Exporting object from 3ds Max into the game Crysis - Material
http://www.veoh.com/browse/videos/category/technology/watch/v6370336wb5dAxab
1. Go to Material Editor > Click Standard > Select Standard to Multi/Sub-Object
2. In Multi/Sub Object Basic Parameters
- Set Number of Materials
- Change the name of mass material
** It must be the same name as the object that is imported.
- Change ID and name
3. For each material > In the Standard Basic Parameters
- Shader – Cytek Shader
- Tick Phyicalise – choose Default
- Default – Anything can collide with the object.
- Physical Proxy – allow to set the object on the ground
4. Creating Map
- Tick Diffuse colour > Click None
- In Select Bitmap Image File window, double click on Bitmap and then select material
- In the Material Editor window, assign the material (3rd tool) and turn it on (9th tool)
And then repeat the processes for other parts of model…
5. Open Editable Poly (On the right hand side)
- Select Polygon
- Select the model 0r Ctrl+A (red) – Press F2 key to turn off the red
- Change material ID and name that is associated with the object you are working on
Tips
- Right click to hide selected object à easily apply to other parts of object
- Right click and select Clone to clone the model
- Change Diffuse Colour, Transparency, Opacity, etc.
____________________________________________________________________________
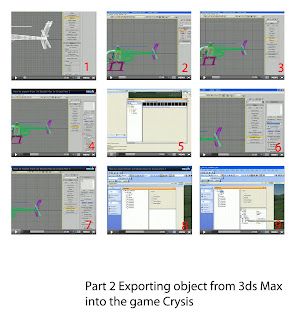
- In left view mode > highlight entire the model >> Click Measure
*Have a look a Dimensions (The actual size of the model will be ten times from it should be, so scale down the model before exporting.)
- Group the object (Group > Group) and then scale it
- Change Absolute World to 0 (for x, y, and z)
2. Set up Dummy (Image02)
- In Object Type (Left window), Click Dummy
- Place the Dummy at the origin 0, 0
- Modify its name
- Go to Top view and move the object to the center
- Go to the H Key and select the Dummy
3. Reset XForm for all parts of the object (Image03)
* does not seem to work on multiple object
- Go to Utilities tab
- Select Reset XForm
- Click on each part of object
- Click Reset Selected
- Select the entire object (except the dummy)
- Right click > Convert To > Convert to Editable Poly
4. Exporting to the Crysis (Image04)
- Select Dummy
- Go to Utility tab
- Click CryEngine2 Export
Firstly, export the material…
- Pull the roller bar down > Click on Create Material
It will bring up Sandbox Editor and ask for material (Image05)
Secondly, export various part of the model…
- In Object Export tab, Select a choice for Export To.. (e.g. Animated Geometry) (06) > Click on Custom File Name
- Select parts/all of object and link them to the dummy
Ctrl+L to seclect the whole object
*Check - Select Dummy (Origin) and Press H Key à Select Form Scene
- In Object Export tab (Left window) > Add Selected (Image07)
Every part that link to the dummy will be exported.
- Click on Export Modes (Left)
General error messages will pop up, ignore it.
- In Object tab, click create Entity
The object is still not in the Browser.
- Go to View > Open View Plan and Select Editor or others
- In the Editor window > Click Open Selected > and Save As…(Image08)
- Close and Open Sandbox Editor again
- The object should be in the Browser (Entity > Browser)
- Go to Editor > Open Selected > Body > open File Name (game/bin/object/..object name..) > Select .cga file > save (Image09)
Tip
- Create Object Folder
- Every name must be the same, e.g. car.max, car.mtl, car.cga
COLLABORATION - CONFLICT
Conflict is generally defined as “a disagreement, different points of view, or different opinion between or among two or more team members or teams” (Topchik 2007, p.105). It is hard to avoid conflict among team members, so we should welcome it. All conflicts are not the bad things. There are some good conflicts which are called “productive conflict”. Productive conflict is “an open exchange of conflicting or differing ideas in which parties feel equally heard, respected, and unafraid to voice dissenting opinions for the purpose of reaching a mutually comfortable resolution”. The results of this productive conflict create new and better possibilities and insights. It is a very creative and dynamic process as individual feels comfortable in sharing conflicting opinions and ideas. (Mark Deo 2009). The following model is the Creative-Collaboration Model created by Topchink.

Step 01 – Express your view of the conflict and invite the other team member to do the same
Team members have the opportunity to present their views of the conflict. In order to present their sides of the conflict, they need to use facts, supporting documents, past experiences, opinions from others, information, etc. Other team members have to be willing to listen and make sure that all concepts have been understood.
Other concerns or issues besides the conflict should also be stated because many times personality, perception, values, belief, work-style differences, or methods on how to do the work are at the core of the conflict.
Step 03 – See the conflict from the other person’s perspective
All team members need to summarise what they have heard others say and at the same time are supportive of differing points of view. They need to listen to one another and to understand other perspectives.
Step 04 – Agree on what, specifically, the problem/opportunity is
It is better for a team to discuss the conflict at length first and then state what the true problem/opportunity is. It is a mistake to identify the problem and make a decision at the very beginning of the process.
Step 05 – Focus on the future
It is vital to discuss the background of the conflict, what has caused it, and the difference perspectives on it. However, the past should not be focused, but rather learn from the past and focus on the future.
Reference
Deo, M 2009, Productive vs. Unproductive Conflict, accessed on
Topchink, G 2007, The first-time manager’s guide to team building,


